How to bypass the need for an MS online account when first setting up Windows 11:
Hit Shift + F10 to open command line
Type “start ms-cxh:localonly”
This will pull up a new window that will allow you to create a local account. (Note – this is updated – Microsoft recently disabled the “OOBE\BYPASSNRO” command)
Providing a PC is still bootable, and Windows 10 is up and running, you can reinstall Windows 10 from an ISO image file and keep your personal files, apps, and Windows settings. An ISO file, commonly known as ISO image, is an archive file that contains an identical copy or image of data found on an optical disc, such as a CD or DVD.
Before starting the process, make sure that you have a good backup of all the personal files on the PC.
Follow the steps below to reinstall Windows 10 using ISO image:
Download Microsoft’s media creation tool to create Windows 10 ISO file
Scroll down to ‘Create Windows 10 installation media’
Download and run the media creation tool
When asked What doi you want to do, select ‘Create installation media (USB flash drive, DVD or ISO file) for another PC’ and click next
The options for Language = English, Edition = Windows 10 and Architecture = 64-bit (x64) should be preselected for you
Deselect ‘Use the recommended settings for this PC’ and click next
‘Choose which media to use’, select ISO file and click next
Choose where to create the ISO file, by default you will be offered the filename ‘Windows’ and Documents folder
The download process begins.
After downloading the newly-created ISO file, right-click on it and select “Mount” to continue
Double-click the Setup.exe file at the root directory
Choose the correct option when prompted to “Download and install updates.” Choose the option if your computer is connected to the internet. If not, select “Not right now.” Click “Next” to continue
Click on “Change what to keep” in the subsequent popup window
Choose the option to “Keep personal files, apps, and Windows settings”
Click “Next” to install Windows 10
At the end of the installation process , the PC will reboot and return to the Desktop
The media creation tool will take around 10-15mins, the Windows 10 installation should take less than an hour.
The automatic update from Windows 10 to Windows 11 can be blocked by changing some registry keys.
Be careful while using the Registry Editor, if you change the wrong key, you can mess up your system.
It is very important to keep your system updated, always check for updates on Windows Update.
Now follow these instructions to block Windows 11 Update:
Right Click the Start Menu and select “Run”
Type regedit and press Enter
On the Registry editor window, go to HKEY_LOCAL_MACHINE\SOFTWARE\Policies\Microsoft\Windows\WindowsUpdate (You can copy and paste the address on the address bar) If you can’t find the Windows Update key, go to HKEY_LOCAL_MACHINE\SOFTWARE\Policies\Microsoft\Windows, right click > New > Key , and name it WindowsUpdate
On the right side of the screen, right click > New > DWORD (32-bit) > and name it TargetReleaseVersion, double click it and set Value Data to 1
Again on the right side of the screen, right click > New > String Value > and name it ProductVersion , double click it and set Value Data to Windows 10
Again on the right side of the screen , right click > New > String Value > and name it TargetReleaseVersionInfo , double click it and set Value Data to 21h2
A TargetedReleaseVersion is a group policy introduced with Windows 10 version 1803. If you specify a TargetReleaseVersion as the current Version, Windows 10 will remain on this release until it reaches the end of service. This would, hence blocking the Windows 11 update. The first command enables the policy, and the second specifies the target version.
Error message when trying to access a shared drive or folder: “You can’t access this shared folder because your organization’s security policies block unauthenticated guest access. These policies help protect your PC from unsafe or malicious devices on the network”
Fixing this problem involves editing the Windows Registry. Be very careful when using the instructions below. Follow the instructions exactly and do not change anything else. If you don’t feel confident to continue, please seek assistance.
Make sure that you back up the registry before you modify it. Make sure that you know how to restore the registry if a problem occurs.
Please refer to the following steps:
Open Run command by Pressing windows + R and type regedit and hit enter to open the registry editor.
Navigate to the following path: Computer\HKEY_LOCAL_MACHINE\SOFTWARE\Policies\Microsoft\Windows
Expand the Windows Registry Key and search for LanmanWorkstation registry key. If you are not able to find the registry key, then you will need to create it.
Right Click on the Windows Registry Key and Choose New > Key and name the Key as LanmanWorkstation.
Now Click on the LanmanWorkstation Registry key and from the right-hand window right click and choose New > DWORD 32 bit Value and name it as AllowInsecureGuestAuth. Double click on the AllowInsecureGuestAuth DWORD and set the value to 1 and click OK.
As the picture below:
Restart the system and check that the shared file is accessible.
This message indicates that the PC user has entered a wrong password a number of times and as a result of which, Windows has locked the account and prevented them from signing in for a particular period of time Windows does not display the specified lock out time, but it’s typically somewhere between 10 and 30 minutes. While
Once you encounter “The referenced account is currently locked out and may not be logged on to” error, we would strongly recommend you leave the PC for 30 minutes. After 30 minutes, the log-in screen may be unlocked, and you may get a second chance to access your desktop.
From experience, it’s worth trying to log into the PC from another computer via Remote Desktop. The account lock out may only be set to prevent access to the PC using the keyboard.
Once you have managed to access your desktop successfully, you should disable the Account lockout threshold policy to prevent “The referenced account is currently locked out and may not be logged on to” error from showing up again.
Fixing this problem involves editing the Windows Registry. Be very careful when using the instructions below. Follow the instructions exactly and do not change anything else. If you don’t feel confident to continue, please seek assistance.
Make sure that you back up the registry before you modify it. Make sure that you know how to restore the registry if a problem occurs.
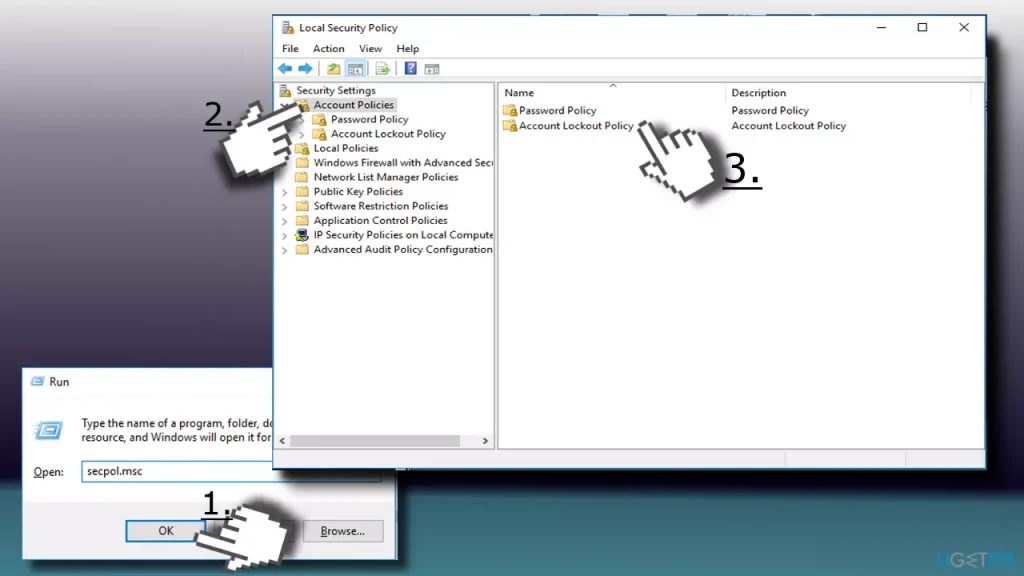
Press Windows key + R, type secpol.msc, and hit Enter.
When the Local Security Policy window opens, select Security Settings.
Open Account Policy and select Account Lockout Policy.
Double-click on the Account lockout threshold policy (on the right) to open Settings configuration window.
To disable account lockout, replace the existing value with 0 and click Apply to save the changes.
Then press OK and close the Local Security Policy window.
How to manually remove a printer driver in the Windows operating system.
Standard method for removing printer driver
Look in Programs and Features and uninstall any program that correlates to the printer driver to be removed.
Open Devices and Printers and if still present, remove the printer driver by right-clicking it and choosing “Remove device.”
To completely remove printer driver
Open the Print Server Properties dialog window by doing one of the following:
Click the Start menu and in the search field type printui /s /t2 and then press Enter or click it in the search list.
Press WINDOWS-R on the keyboard to bring up the Run window, type in printui /s /t2 and then press Enter or click OK.
Press the WINDOWS key on the keyboard to display the Start screen, type in printui /s /t2 and then click it in the search list.
From the Start menu or the Start screen:
Open Devices and Printers.
Select any printer and then click “Print server properties” at the top of the window.
Click on the Drivers tab.
Select the printer driver to uninstall.
Click the Remove button.
Select “Remove driver and driver package” and click OK.
Removing the driver package will clear all driver installation files for that device, leaving no reference to the printer that Windows could possibly use to auto-reinstall again.
The print spooler is a file that manages the printing process. To clear and reset the print spooler:
In the search box on the taskbar, type services, and then select Services in the list of results.
Select the Standards tab, and then double-click Print Spooler in the list of services.
Select Stop, and then select OK.
In the search box on the taskbar, enter %WINDIR%\system32\spool\printers, select %WINDIR%\system32\spool\PRINTERS in the list of results, and then delete all files in the folder.
In the search box on the taskbar, search for services, and then select Services in the list of results.
Select the Standards tab, and the double-click Print Spooler in the list of services.
Select Start, select Automatic in the Startup Type box, and then select OK.
Alternative method using the command prompt:
Open Start, type cmd, and run as Administrator.
Type: net stop spooler and press Enter.
Type: del %systemroot%\System32\spool\printers* /Q and press Enter.
Keyboard shortcuts are keys or combinations of keys that provide an alternative way to do something that you’d typically do with a mouse. More shortcut keys.